Stuffing files away in the cloud might not be on your bucket list, but object storage in Oracle Cloud is quite useful in several situations.
Storing files in OCI Object Storage
Object storage can be used as you would use Amazon’s S3 through a special API provided in OCI. You can even store your RMAN database backups through a Swift API. But I will just upload and download a bunch of files.
As usual I am using the Oracle Cloud Free Tier. When I come up with a good business idea that requires more space and power I’ll upgrade to a paid account. This link at oracle.com shows you how to sign up if Oracle Free Tier is news for you. (I blogged about it in Norwegian almost three years ago.) The Free Tier gives me 20GB for object storage.
My plan is to explore the API from Python and APEX & PL/SQL. I got involved in a cool project and we figured out we need to store some images in the cloud, and retrieve it without much hassle.
But first, we need to get started.
Installing the command line interface
If you have never used OCI before this section shows you how get started with the command line interface (CLI). But if you already has oci installed and configured then scroll down to next section.
The CLI is supported on Windows, Mac and a bunch of Linux versions. The Quickstart in the Developer Guide takes you straight to the list of environments and how to get started. I’m using my Mac for this demo:
brew update
brew install oci-cli
Simple test to see if the oci command is available:
oci --version
oci --release-info
The first returns a version number like 3.40.1 which is the version when I am writing this. The second command checks to see if there is a new version and the news it has for you. Next step is to create a configuration that the tool will use. This is the interactive way to do it:
oci setup config
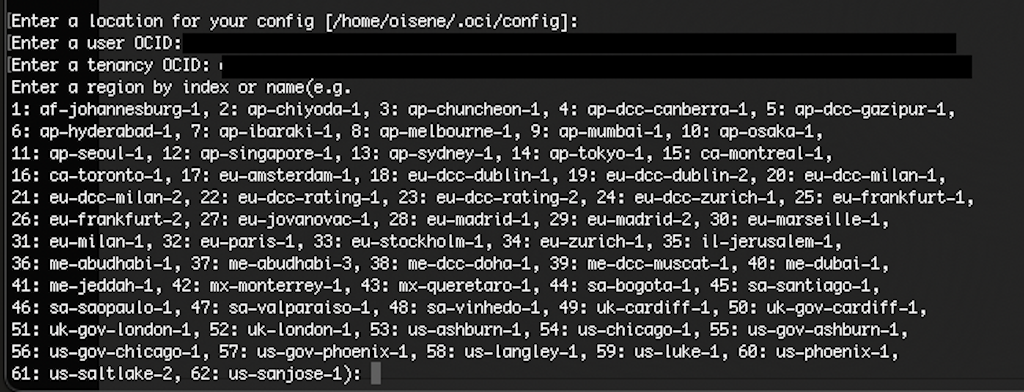
It will ask for a few things you probably don’t keep in your head, so you may just sign into your cloud account now, and click on the Profile icon:
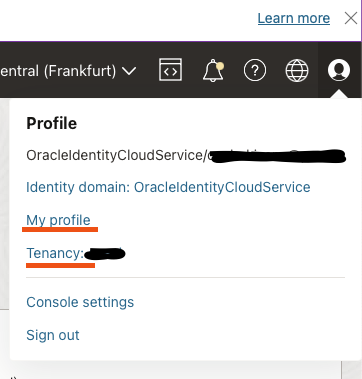
First it asks for the location of the configuration file. The default is OK, which in my case is /Users/oisene/.oci/config where /Users/oisene is my home directory. Next question is my user OCID which can be found by selecting My profile from the menu in previous picture. Then it asks for the tenancy OCID, which is found by selecting Tenancy: your_tenancy in the same menu. Third question is the region that I am using. You can see part of it in the last screen capture above; it is part of the navigation bar. But there are two locations in Frankfurt in the list (index 25 and 26), it is not obvious which one I am using. I am using Germany Central (Franktfurt), but is that eu-frankfurt-1 or eu-frankfurt-2? You can find out by clicking on the region name, and the Manage Regions as shown here:
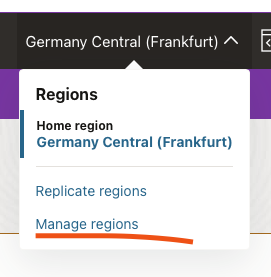
It lists the regions including the region identifier for each. Mine is eu-frankfurt-1. It now asks me:
Do you want to generate a new API Signing RSA key pair? (If you decline you will be asked to supply the path to an existing key.) [Y/n]:
I had one, but I deleted it just to make sure that I started from scratch as may be your case. I accepted the defaults three times; Y, the location for the keys, and the name for my key. Since I am lazy I wrote N/A for passphrase to my keys; my key pair is probably not worth stealing, and I can always delete it later. At the end it prints out some helpful text with a link to a page that explains how you add this API Signing public key to the console
. So, from the same menu as earlier, I choose My profile and in the menu on the right side I select API Keys and add the public key I just created:

I then choose Paste a public key because it is easier to show the contents of the file in my terminal, copy and paste it into the text box than to search for the file and upload it. You can paste the whole content including the lines -----BEGIN PUBLIC KEY----- and -----END PUBLIC KEY-----.
When you are done it will show you a configuration file preview, which is almost exactly what you have just created with the command above and stored in the config file. Sorry about that; next time you can go straight to this place and generate a new API key pair and it will generate the config-file for you. It only lacks the path to your key file, which is the file with your private key (oci_api_key.pem if you used the default value).
OK, we are now ready to actually use this CLI. For instance I can list all my compartments with oci iam compartment list.
First test of object storage
The documentation for Object Storage can be found here
. But you do get a lot of help with just executing oci -h or oci without any options, commands or arguments. The object storage commands start with os, and there is help available with oci os -h.
Many of these commands require an option --compartment-id or (the shorter -c ). Since it is quite long I use a tip from the manual and define it in an environment variable C:
export C=ocid1.tenancy....
For now, I am going to put my stuff on the top compartment, whose id is the same as the OCID for the tenancy. If you list all your compartments with oci iam compartment list, it uses the OCID of the tenancy as default value for the -c option. And in case you already forgot, the OCID of your tenancy is now in your config file.
For instance to list all your buckets you execute:
oci os bucket list -c $C
My list is empty, but I can create a new bucket with:
oci os bucket create -c $C --name labbucket
It returns with a JSON document describing the newly created bucket. This commands uploads a file to this bucket:
oci os object put -bn labbucket --file dolphinframe827.jpg
Yes, that is a picture from last vacation at Fernando de Noronha :

Back to work (or labbing). I now have a memory from last vacation in the cloud. I can download it from anywhere by logging into cloud.oracle.com and navigate to my list of buckets as show here:
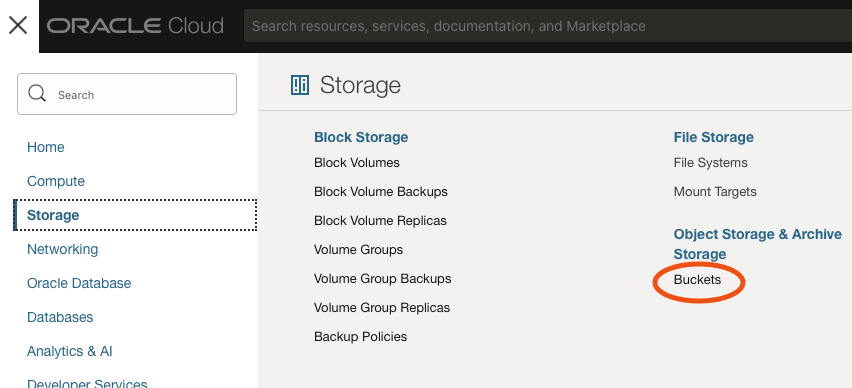
When I click on my bucket I get a list of objects in it that I can select and download.
Some terms
Since they called it object storage it should not surprise us that they have more abstract terms. A few things are important:
Object
This is what you store, just about anything, that’s probably why they called it object. In my case here it is a file. Well, a file is also just a (binary) stream. From Python you can store whatever you can serialize to a byte stream.
Bucket
You have seen it briefly in the example above, it is like the drawer, bag or general collection of stuff. This is where you throw stuff into. A bucket resides in a region. It is associated with a compartment as you saw in the command example above, i.e. you need to select which compartment it belongs to.
Namespace
A space for names? It is just another level of isolation, and simplifies some of the handling later. The manual says:
A namespace is a logical entity that serves as a top-level container for all buckets and objects, …
Not abstract at all. Nobody has the same namespace as you do. The bucket names must be unique within one namespace, but you can replicate whatever you find in other tenants inside your namespace without risk of confusion.
You can get your namespace with this command:
oci os ns get
You have one from the time your tenancy1 was created, it is a random string of letters. I have not seen any way to create other namespaces, so in practice, the namespace becomes just an alias for your tenancy used in the context of object storage. (You can execute the previous command with -c and specify another compartment, but it returns the same namespace in my case.) Also it does simplify management of objects between tenancies. When putting objects to a bucket you can specify namespace, but since we usually don’t, a call to oci os ns get is performed internally according to the manual.
Compartment
In your tenancy you have a root compartment, and you create more compartments below it as you need to organize stuff. When you create a bucket you need to select a compartment with option -c as demonstrated above.
Storage tiers
I would like to start exploring this stuff from Python, but I should mention that there are three different tiers for object storage:
- Standard - default tier. Optimal tier for frequently accessed data
- Infrequent Access - as the name implies, if you have data that is not accessed much, or the access time does not impact end users than this is more economical
- Archive - For data you don’t need access to unless you restore them. Objects here are not immediately available, just like stuff in an archive often is not readily available. This is the place for data you don’t dare the delete, but sure have no use for now and foreseeable future.
You can specify default tier for a bucket, Standard or Archive (but not InfrequentAccess). If default is Standard the bucket may have a mix of Standard, Infrequent Access and Archive. But a bucket with default tier Archive cannot have objects on other storage tiers. This is a bit confusing. When you upload (put) an object you can specify all three, and for a bucket with default storage tier Standard all three will work.
If you have upgraded from Free Tier you may save some money by using Infrequent Access, assuming your access pattern allows for it. Auto-Tiering helps you reduce costs. It can automagically move objects in the Standard tier to Infrequent Access if the activity in your project drops. Auto tiering is off by default, but you can enable it with a parameter to the create command or update an existing bucket with:
oci os bucket update -bn labbucket --auto-tiering InfrequentAccess
I’ll probably dig more into these details when I have a cloud bill to pay. For now it is all free for me.
The Python SDK
There are at least 7 Software Development Kits (SDKs) you can use to access OCI. I’ll be using the Python SDK since most of the cool stuff happens in Python these days (not as cool as SQL, though). Brendan Tierney shows you in Python for OCI installation and configuration how to set up the Python library and configuration. You’ll probably enjoy the break and have a look at his first.
Both the information at the Python Package Index and the reference at docs.cloud.oracle.com are useful. If you are new to the SDK the first is a good place to start, if you want to explore the Object Storage API in particular then the reference at Oracle has code examples for six SDKs as well as the REST API (which all the SDKs are using) under each operation. Under each method description in the Python API reference there is a link to a code sample.
First install the package:
pip install oci
Then a small Python program to see that it works with DEFAULT profile:
import oci

config = oci.config.from_file("~/.oci/config")
identity = oci.identity.IdentityClient(config)
user = identity.get_user(config["user"]).data
print(user)
It returns 33 lines of JSON.
Unlike the oci CLI command, the parameter namespace_name is mandatory as well as the compartment_id in list buckets for instance:
os_client = oci.object_storage.ObjectStorageClient(config)
ns="frytqguihzrv"
c="ocid1.tenancy.oc1..aaaaaaaa....."
buckets = os_client.list_buckets(namespace_name=ns,
                                compartment_id=c)
print(buckets.data)
New bucket for my Python stuff:
new_bucket_response = os_client.create_bucket(
    namespace_name=ns,
    create_bucket_details=oci.object_storage.models.CreateBucketDetails(
    name="pythonstuff",
    compartment_id=c,
    storage_tier="Standard"))
new_bucket_response.status
Look at the documentation for Object Storage in the Python SDK
; all the methods you need are methods under the ObjectStorageClient as demonstrated above.
Reading a file in from disk and put the binary stream to a bucket is easy with:
with open("cat.png","rb") as f:
    cat_data=f.read();
upload_response = os_client.put_object(namespace_name=ns,
                     bucket_name="pythonstuff",
                     object_name="cat.png",
                     put_object_body=cat_data)
upload_response.status
There are a several optional parameters, I only used the mandatory ones, but this simple demo shows how easy it is. Cat pictures are popular, or else I could have used the storage_tier parameter to specify InfrequentAccess.

Listing objects in a bucket:
object_list = os_client.list_objects(
                namespace_name=ns,
                bucket_name="labbucket",
                fields="name,size,timeModified")
print(object_list.data)
Without the fields parameter above, it will only show the name. Get stuff back can be done with:
get_response = os_client.get_object(namespace_name=ns,
                                    bucket_name="labbucket",
                                    object_name="dolphinframe827.jpg"
                                   )
get_response.status
with open("dolphins_from_cloud.jpg","wb") as f:
    f.write(get_response.data.content)
This get_object function above returns an object of class oci.response.Response. So does list_buckets. The attribute data type depends on the request. For get_object the data has type oci._vendor.requests.models.Response. I did not find the documentation particularly strong at this point, but I explored the returned object in Python and guessed the method to use in order to fetch the content so I could store it to a file.
I have a lot more to investigate here, both in Object Storage and other services in OCI. In next post I will look at how to access Object Storage from PL/SQL.
-
Oracle uses both tenancy and tenant in the documentation, so I’ll do the same, possibly not by the same logic. ↩︎